In my last post I updated how to make check-in comments mandatory for your TFS projects. In this one, I want to drill further down and show how to set policy to make linking change set to Work items (in my case tasks mandatory). First, understanding task...(read more)![]()
↧
{QUICK TIP} MAKE LINKING WORK ITEMS MANDATORY FOR YOUR DYNAMICS CRM TFS PROJECTS
↧
The Magical World of Rectangles in Dynamics NAV RDLC Reports
The Magical World of Rectangles in Dynamics NAV RDLC Reports

One of the challenges of report writing in Microsoft Dynamics NAV’s (Navision) Report Definition Language Client (RDLC) reports is creating multiple repeating data sections pulling from a single dataset. The easiest example I can think of comes from sales orders: You want to have your sales order show the sales lines attached to the sales header, and then the sales comments attached to the header, all in the same report.
The challenge of doing this is that, NAV flattens your dataset for the different sections, but it wants the display for your report to be based around a tablix object with a page header and footer. The tablix is based on your dataset, and it repeats for every row in your dataset. You can think of it like a big spreadsheet, where each row is a record touched by your report (regardless of which table the record is in) and each column is a data field to show in your report (regardless of which table the data field is in). In fact, if you exported the dataset for our sales order report into Excel, you’d see the header information over and over again on each line, and then you’d see rows where the sales line fields were filled and the sales comment fields were null, and after that you’d have rows where the sales line fields were null and the sales comment fields were filled.
If you try to handle this with one tablix, you’ll get frustrated pretty quickly. You’ve got to mess around with column sizes and merging columns and un-merging columns and hiding rows based on whether or not the values from the sales line or comment are null, and it’s infuriating. Everything has to be balanced just so, and even then, the layout looks pretty ugly. (As someone who started out in the world of IT by writing HTML back in the 90’s, it reminds me of how we’d throw our web page layout into tables to get it to work with columns, and then we’d put tables in our tables to get the sub-sections to look right, and then there’d be tables in the subsections, until you had 38 tables inside each other, like a Russian nesting doll. And if you were really unlucky, the person who’d coded the page before you got to it didn’t bother indenting the code for the tables, so you had a bunch of incomprehensible markup and you’d have to spend an hour figuring out which layer of table you were in to change anything. I don’t miss the days when I had to agonize over web page layouts.)
There’s a better way than trying to do everything in one tablix, though. The secret is to create a rectangle, then put one tablix in the rectangle for each table in the report that you want to display, and then hide the tablix when you’re not looping through the table it was intended to display.
To explain: First, start by deleting the default tablix for the report that’s in the body section of the layout. Next, create a rectangle object in the body section of the layout, and then put a new tablix in the rectangle for each table you need to show data for. Set up the columns and cells of the tablix for the data you need to display. If you run the report at this point, you’ll see a whole bunch of extra rows in your tablixes. (Maybe that should be “tablixs” or “tablux”? I honestly don’t know what the plural of “tablix” is, so I’ll punt. Someone can feel free to correct me in the Comments if I’m off-base.)
The secret to getting rid of those extra rows is actually quite simple. Pick a field in each row that will always have a value—you can actually put fields in your dataset specifically for this purpose and just not display them. For the sales order example I’ve been using here, I’d use the Sales Line.Line No. and Sales Comment Line.Line No. fields. Go to the Row Groups for the tablix in the report designer and find the lowest-level Details section for the tablix. If you select it, you’ll be able to see all the properties for the section in the Properties window. Set the Hidden property for the tablix member to an expression of IsNothing(Fields![your field name here].Value]). That will make the system do an evaluation for each row in the data set so that if the dataset has a null value in that field, the tablix won’t show that row.
And that’s really about all there is to it.
If you have any further questions about this or other development issues, please contact one of our development experts at ArcherPoint. If you enjoyed this blog, you might like to read more of Tom Hunt’s blogs, or check out our collection of Development Blogs.
Special video gamey update: I am hyped for Street Fighter V. I am so hyped for it that I went out and bought a PS4 for it, even though the game won’t be out for at least a year. I’m reminded of the halcyon days of my youth, when I was so excited about Final Fantasy VII that I bought a PlayStation 1 a year before that came out. (I actually still have the t-shirt I got for pre-ordering FF VII, by the way.)
- Tom Hunt's blog
- Log in or register to post comments
↧
↧
Installing an additional AOS
If you have being working with AX for a while as an administrator you are probably quite familiar with the procedure of installing an additional AOS. If you are new to AX then this might be something new...(read more)![]()
↧
Using Skype for Business with the AX client
AX has had the ability to initiate communication through Lync and prior to that Office Communicator client for a while. Now that Lync has been updated to Skype for Business I thought I’d give it...(read more)![]()
↧
Setting up contact for instant message usage
If you want to use the ability to call or instance message from the AX client to a contact they you have to have a few things configured. Firstly have Office Communicator client, Lync client or Skype for...(read more)![]()
↧
↧
Edit SharePoint page does not display the web parts
When doing Enterprise Portal development, it might happen that when you are going to say Edit on the SharePoint page, you will not see it in editing mode with all the web parts available for editing or...(read more)![]()
↧
GetAttributeValue demystified
Note: the content of this post is similar to this post from Dave Berry but I wanted to approach the same argument with some example code and tips.
Dynamics CRM allows to create fields with the following data types:![]()
Except for "Single Line of Text" and "Multiple Lines of Text" (both use string), each one uses a different underline data type in .NET, some of these data types are nullable, some are not.
What means nullable and why we need to care about this?
Let's start with an example: In our CRM we have two records, the first record has all the fields filled with a value, in the second one all the fields are empty. When we use GetAttributeValue and there is a value, the method (fairly) returns the value. But what happens with our empty record? The response is "depends".
GetAttributeValue uses Generics, so we can choose to get a nullable type or not:
The next table is a summary:
For the types that can hold null, we use GetAttributeValue and after check if it's null or not:
If we are in a loop and we need to do a sum of an int field, the default value (0) is ok, so we can just do
DateTime is a particular case, it can't hold null but the default value (MinValue = 01/01/0001) can't be a valid CRM value (as happens with bool and numeric fields) so we can do the following check:
Now you are a Dynamics CRM True Survivor!![]()
Dynamics CRM allows to create fields with the following data types:
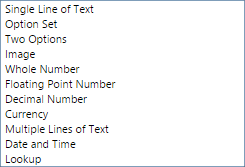
Except for "Single Line of Text" and "Multiple Lines of Text" (both use string), each one uses a different underline data type in .NET, some of these data types are nullable, some are not.
What means nullable and why we need to care about this?
Let's start with an example: In our CRM we have two records, the first record has all the fields filled with a value, in the second one all the fields are empty. When we use GetAttributeValue and there is a value, the method (fairly) returns the value. But what happens with our empty record? The response is "depends".
GetAttributeValue uses Generics, so we can choose to get a nullable type or not:
In this case, if the value is null (for a Boolean/Two Options field means that no value is set) the first variable will contains false, the second will contains null.
bool boolean = entity.GetAttributeValue<bool>("new_boolean");
bool? booleanNullable = entity.GetAttributeValue<bool?>("new_boolean");
The next table is a summary:
| CRM Type | .NET Type | can hold null? | default value |
|---|---|---|---|
| Single Line of Text | string | Yes | |
| Option Set | OptionSetValue | Yes | |
| Two Options | bool | No | false |
| Image | byte[] | Yes | |
| Whole Number | int | No | 0 |
| Floating Point Number | double | No | 0.0 |
| Decimal Number | decimal | No | 0 |
| Currency | Money | Yes | |
| Multiple Lines of Text | string | Yes | |
| Date and Time | DateTime | No | DateTime.MinValue |
| Lookup | EntityReference | Yes |
For the types that can't hold null we need to ask ourselves: "The default value is enough for the requirement?"
EntityReference lookupRef = entity.GetAttributeValue<EntityReference>("new_lookupid");
if (lookupRef == null) {
   // no value set
} else {
   // we have a value
}
If we are in a loop and we need to do a sum of an int field, the default value (0) is ok, so we can just do
but if we are doing a multiplication we need to skip the null values, so we use int?
int totalSum = 0;
foreach (Entity row in RowCollection.Entities) {
   int number = entity.GetAttributeValue<int>("new_wholenumber");
   totalSum+=number;
}
otherwise with a null value our totalMulty variable will be 0.
int totalMulty = 0;
foreach (Entity row in RowCollection.Entities) {
   int? number = entity.GetAttributeValue<int?>("new_wholenumber");
   if (number != null) {
      totalMulty*=number;
   }
}
DateTime is a particular case, it can't hold null but the default value (MinValue = 01/01/0001) can't be a valid CRM value (as happens with bool and numeric fields) so we can do the following check:
Practically when we don't use the nullable form, Dynamics CRM is doing the following:
DateTime dateTime = entity.GetAttributeValue<DateTime>("new_datetime");
if (dateTime == DateTime.MinValue) {
   // no value set
} else {
   // we have a value
}
The combination of the nullable form and the GetValueOrDefault can be useful in some scenarios. Let's say that we need to do a data migration to an external system, but if the source decimal Quantity is null, the target decimal Quantity must be -1.
double floating = entity.GetAttributeValue<double>("new_floating");
// equals to
double floating = entity.GetAttributeValue<double?>("new_floating").GetValueOrDefault();
In this way we deal automatically the null values and they are ready for the target system.
decimal quantity = entity.GetAttributeValue<decimal?>("new_quantity").GetValueOrDefault(-1);
Now you are a Dynamics CRM True Survivor!
↧
What is max degree of parallelism option setting in SQL Server?

A ticket opened recently with Microsoft support involved changing a the max degree of parallelism on the SQL server.
I had not used or heard of this setting before, which isn’t a surprise I tend to leave SQL Server settings to the people who know more about the consequences.
Early in the year I did look at effects of changing the SQL Server trace flag 8780 which resulted in reports running faster but is unsupported unless Microsoft support teams advices you to do it!
CRM SQL Query go faster trick – SQL Server trace flag 8780
My goal in this blog is to give an overview about max degree of parallelism Option and some links to more information.
Remember to always consider the effects of changing flags and options, they can change results/efficiency in other SQL queries
What is max degree of parallelism Option
The place to start is the MSDN article
max degree of parallelism Option
When SQL Server runs on a computer with more than one microprocessor or CPU, it detects the best degree of parallelism, that is, the number of processors employed to run a single statement, for each parallel plan execution. You can use the max degree of parallelism option to limit the number of processors to use in parallel plan execution. The default value of 0 uses all available processors up to 64 CPUs
You can learn more about Degree of Parallelism in this specific article
This setting is sometimes known as MAXDOP (max degree of parallelism)
Hosk understanding
This max degree of parallelism controls how many processors in the SQL server can be used on any one single query.
The default value for Max degree of parallelism is set to 0, this means there is no limit to the number of processors.
If you change the option to a number e.g. 1, you are then limiting the SQL server to use one processor for each query.
This setting seems to be changed when users want to limit the number of processors used in single queries to stop SQL server taking all the processors for single queries.
The setting is also used to increase the number to improve performance in single queries.
This is a server side setting so you need to consider how changing this setting could effect the performance of all SQL queries on the SQL server (and maybe not just CRM)
More information
This article is very useful because it mentions limitations and restrictions and recommedations
Configure the max degree of parallelism Server Configuration Option
This recommendations I found interesting
- This option is an advanced option and should be changed only by an experienced database administrator or certified SQL Server technician.
- To enable the server to determine the maximum degree of parallelism, set this option to 0, the default value. Setting maximum degree of parallelism to 0 allows SQL Server to use all the available processors up to 64 processors. To suppress parallel plan generation, set max degree of parallelism to 1. Set the value to a number from 1 to 32,767 to specify the maximum number of processor cores that can be used by a single query execution. If a value greater than the number of available processors is specified, the actual number of available processors is used. If the computer has only one processor, the max degree of parallelism value is ignored.
- You can override the max degree of parallelism value in queries by specifying the MAXDOP query hint in the query statement. For more information, see Query Hints (Transact-SQL).
It seems to suggest you can set it on an individual query basis.
Here is another article
How to change the Max degree of parallelism Option
It’s an SQL option so set the value using an sql statement.
I took the code from this page
https://msdn.microsoft.com/en-us/library/dd979074(v=crm.6).aspx
exec sp_configure 'show adv', 1;

RECONFIGURE WITH OVERRIDE;

exec sp_configure 'max degree', 1

RECONFIGURE WITH OVERRIDE;

Exec sp_configure
This is a server wide setting, so it would effect all the CRM organisations you have on the SQL Server and other databases.
How does is this setting used with CRM
Take into account I have not had any personal experience changing this setting, I saw it was mentioned as a possible resolution, I decided to investigate.
This setting usually effects CRM if you have multiple long running queries. It can cause the CRM performance to slow.
This article talks about CRM 4
Microsoft Dynamics CRM Server performance is less than expected
In the example above it seems the SQL server was using all the processors on one long running query which caused performance of CRM in general to slow down. It limits sets the MAXDOP to 1 to stop this.
This article is very good and the blog looks into the setting in detail
Max degree of Parallelism in SQL Server
The article concludes it’s probably best to tinker with this setting only if your having slow performance from your SQL server/CRM.
Other articles
Interesting forum discussions
Max degree of parallelism setting
Filed under: CRM, SQL Server, SQL Server 2012


↧
Setting up your Dynamics CRM Development & Source Control Environment
Every time I meet people trying to get CRM projects going, I get plenty of questions about how to setup environments and source control properly. Unfortunately, there is no easy answer. However I thought I would share a model that I’ve used on many occasions and that works well with a combination of a defined […]![]()
![]()

↧
↧
Update order header through AIF
The following code sample shows how to update an existing order through AIF from outside Dynamics AX 2012 . Scenario is the we need to update some of the fields at header of Order.
 public static int UpdatePurchaseOrder(string _purchId, CallContext CallContextObj = null)
     {
       try
       {
         KeyField keyField = new KeyField() { Field = "PurchId", Value = _purchId };
         EntityKey entityKey = new EntityKey();
         entityKey.KeyData = new KeyField[1] { keyField };
         EntityKey[] entityKeys = new EntityKey[1] { entityKey };
         if (CallContextObj == null)
         {
           CallContextObj = CallContextSettings.getCallContextObject();
         }
         using (ANPurchOrderServiceClient client = new ANPurchOrderServiceClient())
         {
           client.ClientCredentials.Windows.ClientCredential.Domain = CredentialsSettings.Domain;
           client.ClientCredentials.Windows.ClientCredential.UserName = CredentialsSettings.UserName;
           client.ClientCredentials.Windows.ClientCredential.Password = CredentialsSettings.Password;
           AxdANPurchOrder PurchaseOrderDoc = client.read(null, entityKeys);
           AxdEntity_PurchTable purchTable = PurchaseOrderDoc.PurchTable.First();
           purchTable.ANPublishedState = AxdEnum_ANPublishedState.Published;
           purchTable.ANPublishedStateSpecified = true;
           purchTable.action = AxdEnum_AxdEntityAction.update;
           purchTable.actionSpecified = true;
           purchTable.PurchLine = null;
           // Invoke the update operation
           AxdANPurchOrder newOrder = new AxdANPurchOrder()
           {
             PurchTable = new[] { purchTable }
           };
           client.update(CallContextObj, entityKeys, newOrder);
           return 1;
         }
       }
       catch (Exception ex)
       {
         Console.WriteLine(ex.ToString());
       }
       return 0;
     }
With above code we did as per need, read the purchase order document through read operation, set some fields and last set actions also. when I try to test the application I got some funny strange error
“Invalid entity action.”
This error confuse me also, as I have set the action also. After some research I came to know that read operation of service is returning both header and lines also, which I don’t need that for my scenario. So the fix is that I need to set the line object to null also and then send for update operation.
purchTable.PurchLine = null;
Question after this fix came In my mind is that can we only read header or specific line through read operation ? I will research about this more. If anyone knows this please share your thoughts with me. THANKS


↧
CRM2013 – Multilookup: Modify the code CRM2011
I migrated the solutions from CRM2011 to CRM2013 but I found a big problem with Multilookup: It does not work… I tryed to use the solution inside this post https://mscrmmindfire.wordpress.com/2014...(read more)![]()
↧
Microsoft Dynamics CRM 2015 – How to Reassign Contacts to a New User
Over time there may be a need where you want to reassign contacts in Dynamics CRM to from one user to another. The situation could be that a user is moving on to a different job so you need to transfer all of their contacts to another user. Another common situation is that the user has too many contacts and needs to unload a few to other users. No matter what the reason, reassigning contacts from one user to another is a very simple process. Just follow the steps below to learn how to reassign contacts to a new user.
- First you need to go into Sales and Contacts in Microsoft Dynamics CRM. Then you need to click on advanced find. If you are using CRM 2013 advance find will be in the three dots. (picture below)

Click here to see all the steps.
Jonathan Fortner, Affiliated, Dynamics CRM Implementation and Support, Ohio
Author information

The post Microsoft Dynamics CRM 2015 – How to Reassign Contacts to a New User appeared first on Affiliated CRM Blog.
↧
Eliminate Trailing Spaces from Fields with KingswaySoft
From time to time you end up with field values that contain trailing spaces. Typically when creating records through the UI or importing from Excel values should be trimmed of any extraneous spaces. When creating and updating records using the SDK this same logic isn’t applied. Normally most people wouldn’t even notice extra spaces being appended to a field value but in cases when you’re working with the data, maybe in some sort of integration these extra spaces can become an issue. One example that comes to mind that I ran across was a customer was trying to import data that had a reference to a lookup field. Instead of using the GUID value they were using the text value. Normally this should would just fine but in this instance it didn’t. I’m not sure exactly how the original data was created but all the values on the reference fields contained extra trailing spaces so when CRM went to do a lookup against the fields it failed because it was not an exact match.

If you have just a handful of fields it’s easy enough just to open the records and delete the extra spaces and re-save. When you run into scenarios with larger amounts of records that option isn’t so appealing. A slightly less painful method is to export the offending records to Excel, use some Excel wizardry to remove the spaces and the re-import. This approach is a bit of a pain because it’s a lot of steps and forces you to export all records because you aren’t able to directly (to my knowledge at least) do an advanced find in CRM for data where you query parameter is only a space – “Ends With <space>”
We still can’t do an advanced find for fields that end with a space from CRM but we can through a FetchXML query in the KingswaySoft SSIS adapter. So to get a jumpstart, in CRM do an advanced find for you field and substitute any letter for the “Ends With” condition and then view the resulting FetchXML. Now all you need to do is change the letter you picked to a space.

In the CRM Source use the updated FetchXML.

Next add a Derived Column Transformation. Take the existing field and use the “TRIM” function to remove the extra spaces.

On your CRM Destination, map the entity id and the updated value back to the original property.

And that’s it! Run the job and only records where the specified fields ending with spaces will get updated.
Special thanks to the folks over at KingswaySoft for naming me an MVP recently!![]()

If you have just a handful of fields it’s easy enough just to open the records and delete the extra spaces and re-save. When you run into scenarios with larger amounts of records that option isn’t so appealing. A slightly less painful method is to export the offending records to Excel, use some Excel wizardry to remove the spaces and the re-import. This approach is a bit of a pain because it’s a lot of steps and forces you to export all records because you aren’t able to directly (to my knowledge at least) do an advanced find in CRM for data where you query parameter is only a space – “Ends With <space>”
KingswaySoft to the Rescue

In the CRM Source use the updated FetchXML.

Next add a Derived Column Transformation. Take the existing field and use the “TRIM” function to remove the extra spaces.

On your CRM Destination, map the entity id and the updated value back to the original property.

And that’s it! Run the job and only records where the specified fields ending with spaces will get updated.
Special thanks to the folks over at KingswaySoft for naming me an MVP recently!
↧
↧
Management Reporter Data Mart integration with Dynamics GP 2015 | Company Integration
Although this is an oldie piece of information, but it is definitely a “Goldie”. With the release of Management Reporter CU 11 and Dynamics GP 2015, a new feature was introduced to control the integration...(read more)![]()
↧
Adding Slicers to a Reporting Services Report – SQLServerCentral
Adding Slicers to a Reporting Services Report is something I’d never really thought about.
The post Adding Slicers to a Reporting Services Report – SQLServerCentral appeared first on DynamicAccounting.net.
↧
How can you leverage the capabilities of Dynamics NAV and OneNote together?
One of the most beautiful things about Microsoft Dynamics NAV other than its immensely powerful ERP (Enterprise Resource Planning) modules and capabilities is its ease of integration with other applications...(read more)![]()
↧
Microsoft SharePoint and Dynamics CRM -- Better Together: Part 5
SharePoint Strengths This post focuses on the strengths of SharePoint. This blog post is an excerpt from an InfoStrat white paper . Portal Framework SharePoint provides a framework for building websites...(read more)![]()
↧
↧
Dynamics GP Essentials: Sales Order Integration–Sales Person and Territory are not populated to Line Items
From fellow MVP Mahmood Alsaadi: Dynamics GP Essentials: Sales Order Integration–Sales Person and Territory are not populated to Line Items
The post Dynamics GP Essentials: Sales Order Integration–Sales Person and Territory are not populated to Line Items appeared first on DynamicAccounting.net.
↧
Parature Update Strengthens Customer Engagement with New Enterprise Service Capabilities
With customer service serving as a major catalyst for business growth and brand differentiation, Microsoft is continuing to innovate in this solution category. Earlier this year we released Parature, from...(read more)![]()
↧
GP Reporting Tip: Turn Any GP Report into a Word Template
A Microsoft Dynamics GP reporting tip that few users know about is that any GP report can be turned into a template in Microsoft Word and saved as a default
Turnkey Technologies explains how to Turn Any GP Report into a Word Template
The post GP Reporting Tip: Turn Any GP Report into a Word Template appeared first on DynamicAccounting.net.
↧